Tuesday 10 November 2015

let your light shine


Hello! It's been over three months since I blogged! Truth is, I've started many projects but just haven't been able to finish anything. The finishing mojo went off on a walkies.

However, now, I have decided to START Lifebook 2015!! This is week one!


Here is my version of The Beacon of Light. The face took forever, but I so enjoyed creating this.


Thank you for looking.

Keeley

Saturday 1 August 2015

SWEET memories


Hello! Today I am sharing a canvas I've made using the Prima Bloom Girl ~ Summer stamp, by Jamie Dougherty.


I've used Prima Color Bloom sprays in Soft Teal and Tea Stain to create some colour. The red is Tim Holtz Distress Stain in Barn Door. These are all water based, so setting them with a matte medium was interesting!


Lots of texture created with a layer of tissue paper ...


... and Tim's Harlequin stencil, with some Prima 3D Gloss Gel.


The sentiment is a rub on.


Finished off my Bloom Girl with Prima flowers and resin butterfly.


I'm entering this in at the following challenges:
Thank you for looking.

Keeley

Sunday 5 July 2015

stars and stripes


Inspired by July the 4th yesterday and loving a red, white and blue colour scheme, which just so happens to be the challenge at Crafts 4 Eternity this week, I decided to recreate the American flag in a mixed media style.


I've used a canvas board as my base and covered it with layers of doilies, Liquitex ink and Dylusions sprays.

I wanted it to look like a crumpled up vintage flag.


I tried to make it look as much as like the actual flag design as possible. I have 13 stripes and 50 stars.


I used the Tim Holtz star stencil for my stars.


I'm entering this into the following challenges:
Thank you for looking.

Keeley
 

Monday 18 May 2015

everything's coming up roses


Hello! Time for my next girl! She came together really quickly.

This time she is worked in acrylics on top of a napkin covered in roses.


I decided to paint her in non-flesh coloured tones for a change. Not sure about the cheeks! Maybe a  bit OTT!

Thank you for looking.

Keeley

Monday 11 May 2015

watercolour girl on fiber paste


Back to my art journal and continuing the journey.

This girl is worked in Schmincke Watercolours, onto a page which has been covered with Golden Fiber Paste.

I had a bit of a love-hate relationship working this girl. The lips drove me to distraction. I went over them sooo many times. Unfortunately, I reverted to pencil at one stage and it then became too waxy to go back over with watercolour, so that it would blend better with the rest of her. Oh well.

Anyway, I have a life, so time to just turn the page ...

Thanks for looking.

Keeley

Sunday 10 May 2015

create magic


Hello, I was just having a play yesterday.

I've decided to create some artwork using different techniques, so that I can hang the finished pieces on my 7gypsies photo carousel. Then I can have them on display in my craft room and also flick through them to inspire me, as needed!

I recently discovered my carousel, still in its original box, in a recent craft room clear out. I bought it four years ago and remember having to hunt it down at the time, so not sure if it is still available to buy.

So this is the first piece that I have made for the carousel, and appropriately entitled 'create magic' to begin my journey.

I started off by pulling a page from my Strathmore Mixed Media Journal. I have literally tons (well six!) of these journals in various sizes and different paper formats. This one is from the 5.5" x 8" journal. A perfect size for practicing techniques and also I thought a perfect size for sneaking away with me on my next holiday ;)

I first of all covered the page with gesso and let it dry.

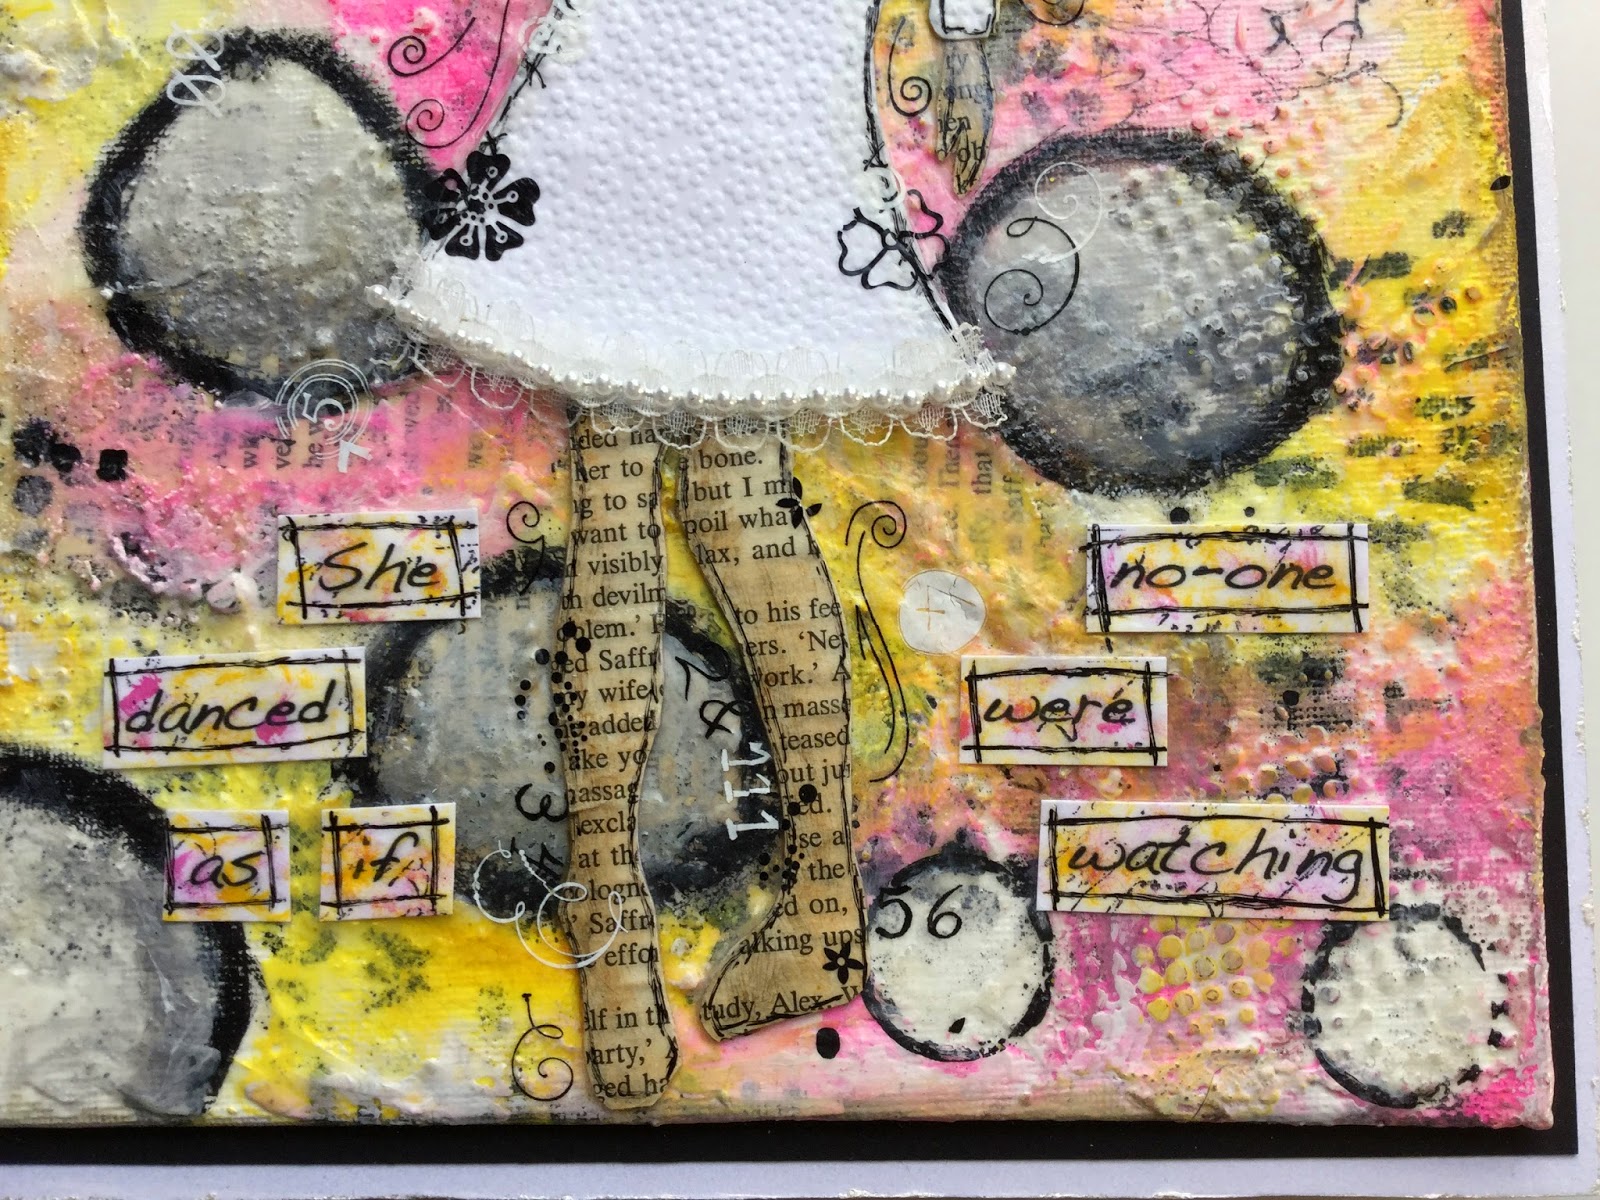
I then covered the page with a Liquitex Matte Medium and smoothed down some book paper over the top of it, ensuring it was firmly pressed down.(Secret: I use old Mills & Boon books for my book papers!).

I waited for a few minutes, and then peeled the book paper off. The exact time is an art to master, as too short and the whole lot will come off and too long and your page will be firmly stuck down!

I was left with a mixture of some words going forwards and some going backwards and some gappy bits. Perfect!


I stamped a Stampers Anonymous stamp down the left hand side. I then drew a line all around the edge with a Faber-Castell Gelato - Metallic Blueberry. I then used a wet paint brush to drag the colour in towards the centre, but not completely. 

This completed the base upon which I would create my girl.


I've coloured the skin with PanPastels. I've added detail with various types of pencils and pens.

For the hair, I've mixed Liquitex ink! with modelling paste and applied it through the Tim Holtz ~ Burlap Layering Stencil. I've then reversed the stencil and applied it to the foot of the page, to bring in some co-ordinating colour to balance the page out.

And that is it! Fun!


Thank you for looking.

Keeley 

Sunday 3 May 2015

blushing mixed media girls


Hello!

Here are my latest mixed media girls on my learning to draw journey.

I created them from Schmincke Watercolours, Prismacolor pencils, paint pens and other pens.

Not sure what they are blushing at ;)

Thank you for looking.

Keeley

Saturday 25 April 2015

Schmincke watercolour girls

Hello! I'm finally back again with a pair of whimsical girls, worked in my watercolour journal.

I've worked these in Schmincke watercolour paints. First time using! I then added the detail to the faces and hair with pens and pencils. Practicing my updos's!


Think I need a LOT more practice with blending my watercolours, but feeling very grown up and arty owning them!


Thank you for looking.

Keeley

Sunday 12 April 2015

be your own rockstar

Hello!

Continuing with my learning to draw journey ...

I wanted to practice with my PanPastels again, loving these! And practicing my turned faces. And up flowing hair!

The face and body are worked in PanPastels, then a few other pencils and pens on top.

The hair was created with Dylusions Ink Spray in Cut Grass and Fresh Lime.

I've painted the background with Dina Wakley Heavy Body Acrylic Paint ~ Lemon. Then with Dina's white paint, I stenciled through Prima ~ Finnabair Alpha Stencil, working it vertically.

I added a few rub-ons and that completes my new journal page.

Thank you for looking.

Keeley

Saturday 4 April 2015

keep a green bough in your heart

Good morning and Happy Easter!

Today I have another whimsical girl to share, being the second in my 'learning to draw' process.

I drew the girl in pencil onto a clear gesso background and then coloured all skin areas with PanPastels. My first time using this medium and I think I like them :)!


I have built up her face with various pencils, including pastel pencils (another new addition to my craft room!).

The background is painted with Dina Wakley ~ Midnight Acrylic Paint.

I thought the hardest part to do would be her hair. My intial sketch wasn't looking too good! However, in the end, it was the part I enjoyed the most and I am pleased with the result.

As you can see, my bird underwent a little operation and changed shape completely! I think I need a lesson in drawings birds!

The sentiment is from the  Dina Wakley ~ Scribbly Birds stamp set.


Thank you for looking.

Keeley

Sunday 29 March 2015

learning to draw ...

... and paint and do all sorts of things, I never knew how!

I decided some time ago, that this would be the year, that I would learn to draw. It is something that has been lurking inside me for a while and now I have decided to get it out of me and see where it will go.

Soooooo, after quite some learning and practice, I am now ready to go public with my first piece!

It was also nice to finally get a page in my art journal mucky! This is a 9 x 12".


This new project is costing me a small fortune in new art supplies! And there was me thinking I already had everything. How wrong could I be!

This is my first time using watercolours also. It is worked in watercolours on an acrylic base. I have used some coloured pencils, water pencils and paint pens also. All new media for me to be working with.

Unfortunately I have so many layers of paint, that you can only just see the patterned cardstock underneath.

I hope you like my girls! On to the next lesson ...

Thursday 12 February 2015

she danced as if no-one were watching


Hi! You may recall this abstract mixed media canvas I made back in November. Details of how I made it are HERE.


Well, I didn't like the abstract-ness of it and it had a disco type vibe to me, so I turned it around and added a girl and a few rub-ons to it. Oh, and turned it into a book.


The girl was created with a Dylusions Couture Collection Stencil ~ Flossie. I built her up in layers, so created a base layer from the stencil, then added the legs, hands and head with book paper and then the dress from a scrap of embossed white card I had.


I added some feathers to create a hat and some gems and rub-ons to decorate the dress. There are swirl rub-ons around her, to create movement.


I printed out the sentiment and distressed it with the same colour gelatos that I had used to create the background canvas.

I am entering this into the following challenges:
Thank you for looking.

Keeley

Friday 6 February 2015

a hundred hearts would be too few


Good morning! Today I am coming at you from Crafts 4 Eternity where our challenge theme this week is Valentine.

I have made a mixed media canvas. 


I first coloured my canvas with three rows of pink gelatos, dividing my canvas into thirds and starting with the lightest shade at the top and the darkest at the bottom.

I then created some texture using different stencils and some texture paste which picked up some of the surrounding colour. Flowers are by Prima.


My heart is a Spellbinders ~ Love Heart die double layered. Then I have my cupid, diecut from the Tim Holtz ~ Love Struck Bigz die. I diecut all from Little Yellow Bicycle ~ Sweet Love collection papers. Everything is edged with silver patina wax.


My heart and arrow are My Mind's Eye Dimensional Stickers popped up on pop dots. The arrow wasn't the right colour, so I rubbed some silver wax patina over it.


My words are cut from the papers. I added some silver wax patina around the edges and then I added some rub ons to blend them in.

 
I am entering this in at the following challenges:
Thank you for looking.

Keeley  

Tuesday 3 February 2015

vintage love mixed media canvas


Good morning! This week I have been asked to guest design at Try It On Tuesday, where the challenge this week is include a photo, vintage or modern.
I have created a canvas and used as my centre piece, a napkin which contained a vintage photo as part of it's pattern. I just decoupaged it onto the canvas.


I then rubbed gelatos all around the outside of the image to the edge of the canvas and smeared it together with a water brush.

I then stamped the words 'love' around the image and added texture paste through a stencil to get the dots. I finished off the bottom of the canvas by wrapping around some ribbon and lace.


The top is finished off with some netting and flowers.


The netting is held in place with some buttons on each side of the canvas and one on top, which are glued into place.


I am entering this in at the following:
Thank you for looking.

Keeley

Friday 23 January 2015

new traditions (with tutorial)


Good morning! I am back again with a canvas that I made for the numbers challenge at Crafts 4 Eternity (where there is also a DT call going on, if you are interested!). I also took a few photos along the way, to show you how I made it.

This is also my guest design piece for Mixed Media Mojo, where I just happen to be this month's guest designer. The challenge there this month is 'new', with the added twist of '15'.

And finally, this is also my piece for the Documented Life Project where for Week 1 the art challenge is book paper and the journal prompt: be your own goal keeper.


I've got a few numbers on my piece. My 15 is on the bottom left hand house, to the right of the pink button. Some of the buttons have numbers stamped on them too.

Here is how I made the canvas.

I started off with an 8 x 8 inch canvas and covered the front and all four sides with Kaisercraft book paper. I used mod podge to adhere the paper to the canvas and then as a seal over the top.


I then added a dollop of gesso to the canvas and then used an old credit card to scrape it over the front and sides of the canvas. The idea is to still be able to see the book paper underneath, but it is now muted slightly.


I then put some mod podge on my craft sheet and added a little Distress Paint ~ Pickled Raspberry. You don't need too much of either. I then mixed them together thoroughly.


Again, using my old credit card, I scraped the mixture over my piece. Not too heavily. I still want to see the book paper peeking through in places underneath. The mod podge helps to seal in the gesso layer below.


I then free cut some houses and a cloud and added them to the papers. I used old Sassafraslass papers that I had. These made it really easy to create my design and the papers have layers within themselves.


Again, covering all the sides.


I then began to work all the paper pieces into the canvas using Faber-Castell Pitt Pens, rub-ons and rubber stamping.


I added real buttons, inspired by the button images on the papers. Then I stamped on them, to merge them into the piece.


The blue speckles on this photo are glitter, which I added on with mod podge.


The windows and door were free cut using the left over scraps from the original Kaisercraft paper that was my first layer on the canvas. You are my sunshine my only sunshine.


You make me happy when skies are grey.

You can still see some of the first layers of uncovered Kaisercraft book paper peeking through in places.


I am entering this into the following challenges:
Thank you for looking.

Keeley